Modifying the Incident Review Page

15FEB2019
I've been using Splunk Enterprise Security for the past few months, but recently one of my analysts came to me asking how to get more information added to both the Incident Review page and in the actual notable events. They said they wanted more context to work with. How can I give them what they want? Also, my new boss smells like teen spirit. What can I do?
Sincerely,
In Need of Notable Knowledge
—
In Need of Notable Knowledge,
Thank you for reaching out; this is a common concern (at least the one about Incident Review page). The good news is that Splunk Enterprise Security (ES) can provide any number of fields within the notable event, but many folks don’t know that it can easily be extended. Let’s walk through how this can be done.
Adding fields to Incident Review and the notable events is really a two-step process. The first is defining the fields that the analysts want to see in the Incident Review screen, and the second is identifying these fields in the correlation search—I would say this step is the most important. To return fields of interest for the notable event, we must ensure that those fields are included in the correlation search and are in our results set.
Since the correlation search is most critical, let’s start with that.
I have a notable event from the Splunk Enterprise Security Content Update (ESCU) that has been created called DNS query length with high standard deviation. When I expand that notable event, I can see that I have a Record Type of A in the Additional Fields but nothing further. The fact that Splunk ES noted that it was a query request is nice, but wouldn’t it be even better to see some additional detail?

If I click on the Correlation Search, ESCU – DNS Query Length With High Standard Deviation – Rule, I can view the search that causes the notable event to fire. Because I want to better understand the search itself, I will copy and paste it into a search screen and run it.
| tstats `summariesonly` count from datamodel=Network_Resolution by DNS.query DNS.record_type
|  `drop_dm_object_name("DNS")`
| eval query_length = len(query)
| table query query_length record_type count stdev
| eventstats stdev(query_length) AS stdev avg(query_length) AS avg p50(query_length) AS p50
| where query_length>(stdev*2)

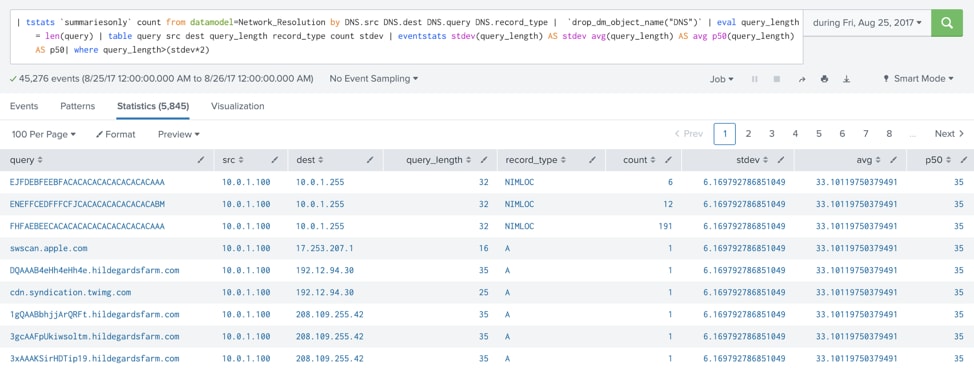
As I review the results, I see a number of DNS queries with high standard deviations; but what I really want to see in the notable event is the query value itself, the system that made the DNS request (src) and where the query is heading (dest). We have the query value in our result, but not the src and dest, so let’s modify our correlation search to add those values.
Here is our modified search (with additions in bold) and our results:
| tstats `summariesonly` count from datamodel=Network_Resolution by DNS.src DNS.dest DNS.query DNS.record_type
| `drop_dm_object_name("DNS")`
| eval query_length = len(query)
| table query src dest query_length record_type count stdev
| eventstats stdev(query_length) AS stdev avg(query_length) AS avg p50(query_length) AS p50
| where query_length>(stdev*2)

By grouping our results by DNS.src and DNS.dest in addition to the fields DNS.query and DNS.record_type that were previously part of the search, I now have the three fields in my results that I want to roll into my notable event. Take note of the names of the fields. These field names will be needed in as we move to the Incident Review configuration.
To configure Incident Review and add our fields in Splunk ES, click Configure -> Incident Management -> Incident Review Settings. There are some handy settings at the top of the screen but if I scroll down, I will see Incident Review – Event Attributes. This is the listing of all the fields that could be displayed within the notable event if there is a field match. As we look through the list, we come across record_type, which explains why we saw that value A in our initial look at the notable event. I also can see src and dest in the list so those two fields are already ready to go.
However, I don’t see a field called query. I have one of two choices at this point—I can either rename the field in my correlation search to match a field name that already exists, or I can create a new entry. For this example, I will create a new entry. At the top right of the Event Attributes table, click Add new entry.

Splunk will give me a Create Attribute pop-up that has two required fields. The label can be anything you want, and the field value will be the name of the field (it's important to note that this is case sensitive). Click Done.

After you add the field, it will appear at the top of the event attribute list like we see below. This is VERY important. Click the Save button at the bottom of the screen, otherwise your new field(s) will not be there when you want them.

I love positive reinforcement!!! Click Done.

At this point we can take our modified search, paste it into our correlation search and click Save. Now our correlation search is updated with two new fields; src and dest and our incident review settings have added query.
Let’s jump back to our Incident Review now and refresh our screen and search for our correlation search again. When we open up the most recently created notable event, we can see that the field DNS Query is now in Additional Fields with a value. That’s very helpful, but where are the src and dest fields?

If you recall, when we edited the correlation search, we added the src and dest fields to the correlation search. Because we only just added them to our search, they don’t actually exist in the notable event we just viewed because the notable event was created before we edited the correlation search. The query field has always been there, so by just updating the Incident Review attributes, we “unlock” it. Previously created notables will not have src and dest in them unless we choose to go back and run historical searches. We'll need to wait until the correlation search runs again to see the src and dest fields that we just added. The good news is that these fields will be in our notables for this correlation search moving forward!
After waiting patiently, we return to our Incident Review page to see that a new notable event has been created and we can now see the destination and source fields populated in the notable event along with DNS Query and Record Type. We also have a number of additional source and destination fields listed as well, but that’s for another day... The point here is that if we identify the field we want to see in our notable event, we can easily modify our correlation searches and settings to get these insights in the Incident Review screen.

One more thing. If your analysts say, “Thanks, but we also want the source and destination address in the Incident Review screen so we can see addressing without having to open the notable,” Splunk can do that too.
Here are three notables from our earlier queue without any modifications to show our starting point.

We can make these changes in the same configuration screen that we were in previously, but this time, we will add values into Incident Review – Table Attributes and order them as we see fit. The entry screens are identical to what we covered previously. Just remember to click Save!
This is the default table layout:

And here it is after we modified the table, adding src and dest:

After refreshing the Incident Review page, our results are returned with the additional columns, src and dest.

I hope this has provided you with a better understanding of how to add additional fields to the Incident Review screen and the notable events. Remember, make sure the field is in your results from your correlation search and the rest is simple.
Best of luck with this!
Sincerely,
Buttercup
P.S. Tell your boss that there is music from the 80’s called “New Wave” that he should look into. Less teen spirit, more teen angst.

----------------------------------------------------
Thanks!
John Stoner
Related Articles
About Splunk
The world’s leading organizations rely on Splunk, a Cisco company, to continuously strengthen digital resilience with our unified security and observability platform, powered by industry-leading AI.
Our customers trust Splunk’s award-winning security and observability solutions to secure and improve the reliability of their complex digital environments, at any scale.


